
- Overview
- Note to Readers
- Preparatory work
- How to enter the storm area
- Space storm resistance
- Equipment with spatial storm resistance
- Storm Area Map Explanation
- Equipment for Conquering the Storm Area
- Four Knights and Boss Characteristics and Drop List
- Regarding the Totems for the Four Knights
- Four Knights: Biri Biri Strategy Guide
- Four Knights: Parapara Strategy Guide
- Four Knights: Guruguru Strategy Guide
- Four Knights: ProPro Strategy Guide
- How to Obtain the Storm Gun
- Boss Lollololo
- Lolololo’s tactics
- How to Proceed to the Ending
Overview
This article covers the final map in Duckov, the Storm Area. Being the last map, the Storm Area presents a considerable challenge to conquer, yet it offers special rewards. Be warned that without prior knowledge of the strategy, first-time players may encounter unique dead ends.
Due to the nature of the map, this article contains various spoilers. Please proceed with caution.
Note to Readers
This article has been machine-translated from the original Japanese. For the most accurate content, please refer to the Japanese Original version.
Preparatory work
- J-Lab Level 3 Access Authorisation
- Equipped with ‘Spatial Storm Defence’
- Spatial Storm Resistance Injection – Weak
To enter the ‘Storm Area’, at least the above three items are required. I shall explain the reasons for each.
How to enter the storm area
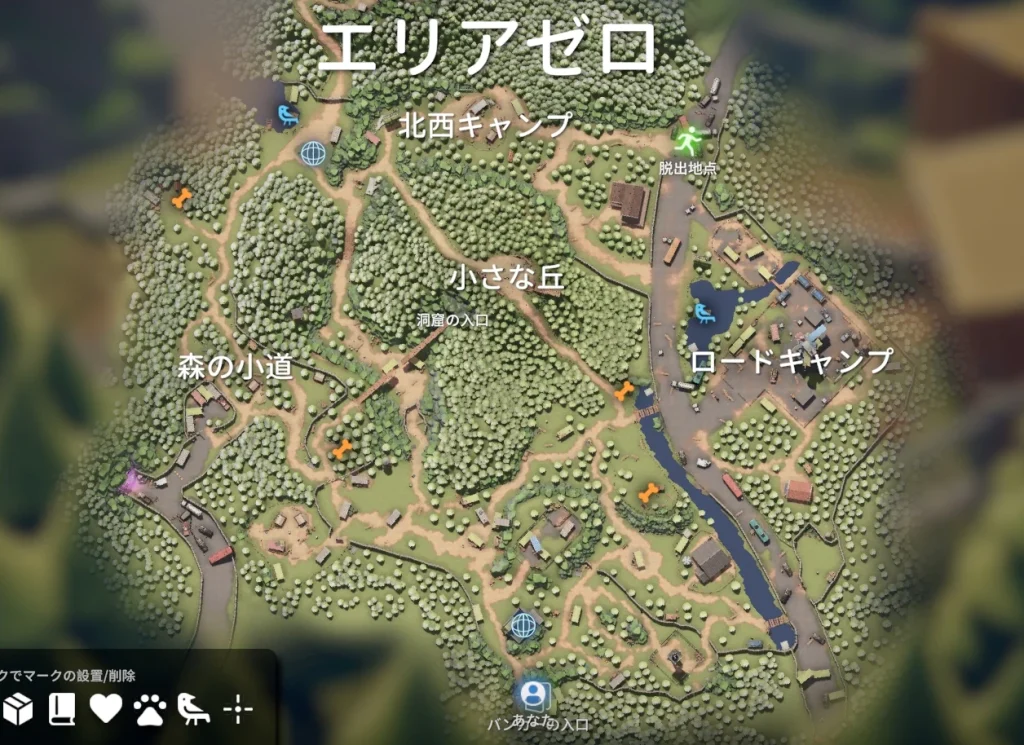
The Storm Area can be accessed via the entrance located in the south-west of the Area Zero map. You should be able to see a tunnel emitting a purple glow on the south-western road of Area Zero’s ‘Forest Path’; that is the entrance to the Storm Area.
To enter this entrance, you require a key item called the “J-Lab Access Level 3”. This J-Lab Access Level 3 is guaranteed to be dropped by the J-Lab boss. Just before the entrance to the Storm Area, there is a fence requiring the J-Lab Access Level 3; without it, you cannot pass through.
Beacon’s manoeuvring
First, activate the beacon. Should you perish before activating it, you’ll have to restart from obtaining the ‘J-Lab Level 3 Access Credential’, which is rather troublesome. The beacon is located on your left as you proceed along the path (refer to the orange ◎ marker on the map).
The injection was administered after entering the storm area.
A key feature of this game is that the syringe’s effect wears off when you move between maps. The Space Storm Resistance Syringe (Weak) boosts your Space Storm Resistance by +1, making it almost essential if your Space Storm Resistance armour isn’t sufficient when entering storm areas. Naturally, you’ll want to use the syringe before entering a storm area to avoid taking Space Storm damage, but its effect vanishes when you move between maps.
If you’re unaware that map travel cancels the syringe’s effect, you’ll meet a mysterious demise in the storm area. I too was initially unaware of this mechanic and lost the item without understanding why.
Trivia
Just beyond the fenced area requiring a J-Lab Level 3 access key, there is a cluster of containers where valuable items such as graphics cards drop directly. Each container can be opened, so we recommend collecting them.
Space storm resistance
- The total spatial storm resistance must be set to 2.
The Storm Area will kill you with spatial storm damage unless your Spatial Storm Resistance is set to 2 or higher. At this stage, the only way to achieve Spatial Storm Resistance of 2 is to pick up two types of rare drop equipment obtainable at J-Lab. Consequently, most players will need to bring the Spatial Storm Resistance Injection (Weak) syringe.
Space storm resistance
Resistance to spatial storms is a status that counters spatial storms. Whilst somewhat similar, it differs from the spatial resistance and damage resistance possessed by items such as the ‘Spatial Resistance’ totem. You must ensure you carry equipment possessing ‘Resistance to Spatial Storms’.
Equipment with spatial storm resistance
- Storm Workwear
- Storm Work Helmet
- Space Defence Suit
- Space Defence Helmet
- Space Defence Suit: Ultimate
- Space Defence Helmet: Ultimate
- Four Knights’ Drop
Equipment with spatial storm resistance obtainable before entering the Storm Area comprises two types: Storm Work Armour and Spatial Defence Armour. Spatial Defence Suits and Helmets are rare drops from J-Lab, making them fundamentally difficult to acquire. They might potentially appear on the black market, though I have never encountered them myself.
The Ultimate Spatial Defence Armour can be obtained by progressing through the Storm Area quests. Named mercenaries within the Storm Area also drop equipment with Spatial Storm Resistance.
How to Obtain Storm Work Gear
- Purchased from a street vendor in the warehouse area
- Storm Work Suit: $4,121
- Storm Work Helmet: $2,457
Storm Workwear can be purchased from the open-air merchants in the warehouse area. The cost is not particularly high.
However, each piece of Storm Work Armour provides only 0.5 Space Storm Resistance, meaning the total resistance is merely 1. As the required Space Storm Resistance in storm areas is 2, you must equip a full set of Storm Work Armour and use a ‘Space Storm Resistance Injection: Weak’ alongside it.
How to Obtain Spatial Defence Armour
- J-Lab Rare Drop
- Min sells (after quest completion)
Spatial Defence Armour is a rare drop from J-Lab. I occasionally found it in the area housing J-Lab’s boss, though it also appears to drop in the ID Card Key Room. Progressing through the Storm Area quests will eventually allow you to purchase it from Min.
Each piece of this equipment provides 1 Spatial Storm Resistance, totalling 2. Possessing 2 Spatial Storm Resistance allows you to completely block the spatial storms in the Storm Area, making exploration there far more comfortable.
Method for Unlocking Spatial Defence Armour
- Quest: “Seek Out the Four Knights”
- Quest: “The First Test Subject”
The ‘Find the Four Knights’ quest unlocks the Spatial Defence Helmet, while the ‘First Test Subject’ quest unlocks the Spatial Defence Suit. Both items can then be purchased from Min.
How to Obtain the Ultimate Blueprint for Spatial Defence Armour
- Quest: The Four Knights
- Quest: Rorororo
The ‘Four Knights’ quest unlocks the Ultimate Spatial Defence Helmet. Completing ‘Rorororo’ unlocks the Ultimate Spatial Defence Suit. As these items can only be obtained by progressing through the Storm Area, players about to enter the Storm Area need not consider this choice.
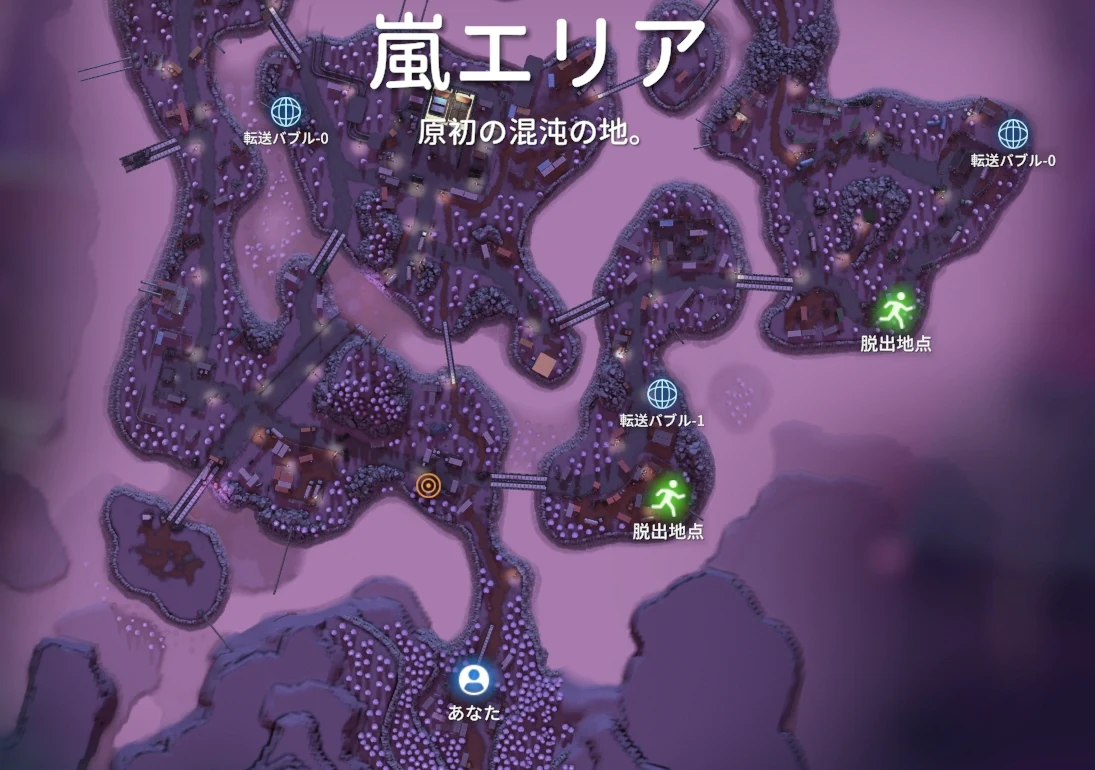
Storm Area Map Explanation
We shall explain it in four parts.
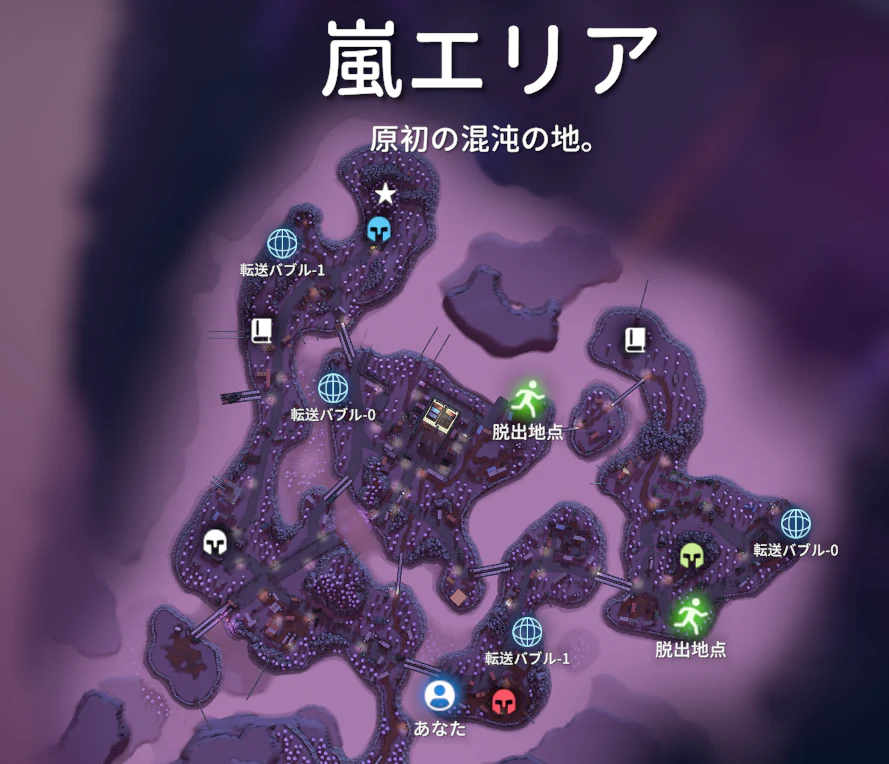
Top left of the map
- Star Mark: “Storm Gun” Blueprint ※Requires Four Knights’ Helmet
- Blue Mercenary Mark: “Four Knights’ Biri Biri”
- This Mark: “Mysterious Spaceship Blueprint” ※Requires External HDD
Bottom left of the map
- White Mercenary Mark: “Four Knights ProPro”
Bottom right of the map
- Red Mercenary Mark: “Four Knights Parapara”
- Green Mercenary Mark: “Four Knights Guruguru”
Top right of the map
- This Mark “Anti-Aircraft System Key” Mobile Location
Map centre
- Final Boss: “Rorororo”
Once you enter the final room in this area, you cannot leave.
Equipment for Conquering the Storm Area
- Weapon 1: Elemental Weapon
- Weapon 2: Non-Elemental Weapon
- Armour: Armour with Spatial Storm Resistance
- Four Knights Totem: Electric Resistance, Poison Resistance, Fire Resistance
- Boss Totem: Spatial Resistance
When tackling the Storm Area, the above equipment is recommended. The Storm Area is teeming with enemies possessing physical resistance, such as Storm Creatures, so an elemental weapon is advisable for your primary armament. My personal recommendation is the “Flamethrower AK47”. While one Elite Mercenary among the Four Knights possesses fire resistance, it can handle all others.
To defeat the named mercenaries, the Four Knights, the “Electricity Resistance”, “Poison Resistance”, and “Fire Resistance” totems will each prove useful, so it’s advisable to keep them in your bag. They are each located underground, accessible via the elevator. The underground maps each have a distinct fire, poison, or electricity-themed appearance, so you should be able to deduce which elemental resistance each Knight possesses.
How to Obtain the Blueprint for the Flaming AK47
- During Phase 2 of the Spatial Storm, Area Zero “Cave”
The blueprint for the Flaming AK47 can be obtained by visiting the caves in Area Zero during Spatial Storm Phase 2. As Spatial Storm Phase 2 requires Spatial Storm Resistance 2, you can acquire it fairly early on if you have Spatial Storm Armour and a syringe containing Spatial Storm Resistance Injection (Weak).
To calculate Space Storm Resistance, check the ‘Space Storm Defence’ stat on your armour. The Space Storm Resistance Injection (Weak) grants +1 Space Storm Resistance. By achieving a total Space Storm Resistance of 2, you can withstand Space Storm Phase 2.
Four Knights and Boss Characteristics and Drop List
| Name | Weapon Attributes | Weakness | Patience | Drop |
|---|---|---|---|---|
| Bilibili | Electricity | Fire | Electricity and Space | Thunder Armour |
| Parapara | Fire | Poison | Fire and electricity | Firearms and Armour |
| Guruguru | Poison | Electricity | Fire and poison | Toxic Weapons and Armour |
| ProPro | Physics | Fire Poison Electricity | Physics and Space | S-Special Ammo Physical Armour |
| Lollololo | Space | Space | Other than space | Anti-Aircraft System Key |
The Four Knights other than Propro drop weapons of their respective attributes. All Four Knights drop armour, helmets, and bags with Spatial Storm Resistance +1. Rorororo drops the Anti-Air System Key, which affects the ending branching.
Equipping the Four Knights’ armour grants Spatial Storm Resistance +2, nullifying spatial storms in the Storm Area and rendering the Spatial Storm Resistance Injection: Weak unnecessary.
In particular, the ‘Guruguru Bulletproof Vest’ and ‘Guruguru Helmet’ dropped by Guruguru are excellent armour pieces, perfect in every way except for lightning resistance, and usable throughout most of the storm area. They are only disadvantageous against Biri Biri, but otherwise boast top-tier armour values. Considering that craftable standard armour typically peaks at around +5 armour, this strength should be easy to appreciate.
| Name | Status |
|---|---|
| Guruguru Armour | Body Armour +6 Spatial Storm Defence +1 Fire Damage Reduction -0.15 Poison Damage Reduction -0.15 |
| Guruguru Helmet | Head Armour +6 Spatial Storm Defence +1 Fire Damage -0.1 Poison Damage -0.1 |
| The Other Four Knights Armour | Body Armour +4 Spatial Storm Defence +1 Resistance to Strengths + Resistance to Weaknesses – |
| The Other Four Knights Helmet | Head Armour +4 Spatial Storm Defence +1 Resistance to Strengths + Resistance to Weaknesses – |
Regarding the Totems for the Four Knights
- Electrical Resistance Totem = Immune to Electrocution
- Fire Resistance Totem = Immune to Burning
- Poison Resistance Totem = Immune to Poison
The Four Knights inflict debuffs that deal slip damage corresponding to their respective attributes. As a countermeasure, poison, fire, and electricity resistance totems prove highly effective.
Note that only level 2 and 3 totems can negate the debuffs. Naturally, level 3 is the most potent. Level 1 totems provide damage reduction for their respective elemental attributes. Should you struggle against the Four Knights, equipping both level 1 and level 3 resistance totems is recommended. Level 2 totems overlap with level 3 negation.
Four Knights: Biri Biri Strategy Guide
Characteristics of Biri Biri
- Attack: Lightning attribute
- Weakness: Fire attribute
- Resistance: Electric, Space
The Four Knights Biribiri attack with lightning-attribute strikes. Their weakness is fire-attribute attacks, whilst they possess resistance to both lightning and space attributes. Consequently, attacks such as the Flamethrower AK47 prove exceptionally effective, but space-based attacks like Space Glick or electrified MP7 are not recommended.
Bilibili Strategy Gear
- Recommended weapon: Flamethrower AK47
- Prohibited weapons: Space/Electrocution attributes
- Totem: Electrocution Resistance Totem
- Electrocution Resistance Injector
When tackling Biri Biri, the Electricity Resistance Totem proves invaluable. The ‘Electrocution’ debuff inflicted by Biri Biri cannot be removed except by nullifying it with the totem. While Electrocution will eventually wear off, it’s quite a burden to constantly monitor your HP, which steadily decreases due to Electrocution during combat.
Four Knights: Parapara Strategy Guide
Characteristics of Parapara
- Attack: Fire-type
- Weakness: Poison-type
- Resistance: Fire・Electric
Parapara attacks with fire-attribute moves. Its weakness is poison-attribute attacks, and it has resistance to fire and electric attributes. Due to this resistance, fire-attribute weapons like the Flamethrower AK47 or the Electrified MP7 are not recommended.
Parapara Strategy Gear
- Recommended Weapon: MF Venom
- Unsuitable Weapons: Fire and Electric Attributes
- Totem: Fire Resistance Totem
- Fire Resistance Syringe
Parapara is weak to poison attributes, so MF Venom proves highly effective. It possesses resistance to fire and electricity attributes, so ensure you fight using weapons of other types at the very least. Like Parapara, it inflicts the fire-attribute-specific debuff ‘Burning’, making fire-resistance totems extremely useful.
How to Obtain the Blueprints for the MF Venom
- Farm Town’s “?”
Occasionally, a red question mark may appear in Farm Town. At the centre of this area resides a mysterious ghost; defeating it will yield the blueprint for MF Venom.
Four Knights: Guruguru Strategy Guide
Characteristics of Gurgle
- Attack: Poison-type
- Weakness: Electric-type
- Resistance: Fire, Poison
Guruguru attacks with poison-type moves. Its weakness is electric, and it possesses resistance to fire and poison.
Guruguru Strategy Gear
- (Recommended weapon: Electrified MP7)
- NG weapons: Fire and poison attributes
- Totem: Poison resistance totem
- Armour: Gas mask
- Antidote syringe
Guruguru is weak to electricity. The MP7 has an electric attribute, making it a recommended choice for defeating Guruguru. Whilst Guruguru possesses fire resistance, the damage from the Flamethrower AK47 does still get through (I defeated it using the Flamethrower AK47). Be sure to bring a poison resistance totem to prevent the poison debuff.
Four Knights: ProPro Strategy Guide
ProPro’s characteristics
- Attack: Physical attribute
- Weaknesses: Fire, Electric, Space attributes
- Resistances: Physical, Space
Unlike the other Four Knights, Propro attacks with physical-type assaults while accompanied by subordinates. Both Propro and its subordinates fire barrages of vertical shots from submachine guns loaded with top-grade S-grade special ammunition, so caution is required. Attribute attacks are largely effective against it, with all types except spatial attribute being effective.
ProPro Strategy Gear
- Recommended weapon: Flamethrower AK47
- NG weapon: Spatial attribute
- Totem: Physical resistance totem
- Grenade
As mentioned earlier, attacking ProPro with elemental damage is effective. While other weapons are acceptable, the Flamethrower AK47 is recommended for its ease of use and damage output. For the totem, a Physical Resistance totem is advisable for its bleeding and damage reduction effects.
ProPro brings minions and unleashes a torrent of bullets from his submachine gun, making grenades highly effective. Any grenade type will suffice. Since there are multiple enemies, throwing in the direction of incoming enemy fire will ensure it hits someone.
How to Obtain the Storm Gun
- To offer the helmets of the Four Knights
Near the star-marked location at the northernmost point on the map, there are points where you can equip the helmets worn by the Four Knights. Once all are equipped, a box containing the blueprint for the ultimate weapon, the Storm Gun, will appear at the star-marked location.
Storm Gun Recipe
- Cube Gun
- Contaminated Weapon Parts 4
- Large Space Crystals 2
- Crystal Boosters 3
- Crystal Filters 3
- Acceleration Devices 2
The materials for the Storm Gun are listed above. Contaminated weapon parts drop from “Storm Creatures”, while large spatial crystals drop from “Storm?” found in the storm area. “Storm?” is a rare monster and is not frequently encountered.
Crystal Boosters, Crystal Filters, and Acceleration Devices can be picked up at J-Lab.
Boss Lollololo
Upon entering the room where Boss Rorororo resides, you will be unable to leave except by defeating him, so please exercise caution when challenging him.
Map
- Random Mercenary 1
- Random Mercenary 2
- Random Mercenary 3
- Final Boss: Rorororo
Beneath the central point of the Storm Area lies the final boss, “Rorororo”. En route to the area where Rorororo resides, there are three small chambers, each randomly housing a named mercenary. Within these chambers are switches; activating all three switches simultaneously grants access to the chamber containing the final boss, “Rorororo”.
Rorororo characteristic
- Attack: Spatial attribute
- Weakness: Spatial attribute
- Resistance: All others
Rorororo attacks with spatial resistance and is weak to spatial resistance. It possesses resistance to all attributes other than spatial resistance, so it is generally recommended to fight it using either the Spatial Grig or the Storm Gun.
Rororo Strategy Gear
- Recommended weapon: Storm Gun
- Totem: Spatial Resistance Totem
To defeat Rorororo, the Storm Gun proves highly effective. Rorororo is resistant to all attributes except Spatial, and only Spatial Glicks and Storm Guns possess this attribute. Spatial Glicks deal low damage with handguns and are therefore not particularly recommended.
The Spatial Resistance Totem is exceptionally useful as it nullifies the ‘Crushing’ debuff, which inflicts slip damage.
Lolololo’s tactics
- Keep your distance
- Beware of multi-stage grenades
- Headshots for swift victories
One of Rorororo’s attack patterns involves multi-stage grenades. It throws grenades in a forward fan pattern, and being hit nearby results in instant death. Therefore, getting close is fundamentally inadvisable. As Rorororo’s attacks are potent, it’s generally recommended to make frequent use of the syringe and aim for headshots to defeat it swiftly in a short battle.
Using a storm gun with high-quality ammunition (large energy rounds) makes defeating it relatively straightforward. Large energy rounds are dropped by the Four Knights other than Propro.
How to Proceed to the Ending
Take the ‘External HDD’ to the book marker in the north-west of the map to obtain the ‘Mysterious Spaceship Blueprint’. Additionally, defeating the final boss, Lolo Lolo, will yield an ‘Anti-Air System Key’. Taking this Anti-Air System Key to the book marker in the north-east of the map will allow you to toggle the anti-air missiles ON or OFF.
Switching the anti-aircraft missiles OFF changes the ending and unlocks a new mode. Find out for yourself what happens!